
Do Web check-in
Find your booking, check your stay, add your ID and confirm, on our website or in your guest portal, before you arrive.
Who can do this: Guest
Updated 3 Nov 2026
Web check-in lets you give us your details and ID before you arrive. It is the same form on our website and in your guest account. You do not need an account to use it on the website. It takes about 2 minutes. Our team finishes your check-in when you arrive.
Take me there
Before you start
- Keep your ID ready. Indian guests use Aadhaar or another Indian ID.
- Guests from outside India keep their passport and visa ready.
- Keep a selfie ready. Every guest adds one: it is required.
- If you booked on a travel site, keep your booking voucher. It can be a photo, a screenshot or a PDF.
- Know your mobile number or reservation ID.
Steps
Tell us how you booked
- Open Web check-in from the menu of our website, or from Home in your portal.
- Read the small card on the first screen. It says Quick check-in · about 2 minutes. It lists your stay dates, your name and ID, and a booking voucher if you booked on a travel site.
-
Tap how you booked. The choices are phone or walk-in, The Raveesh website, or a travel site such as Airbnb, Booking.com or MakeMyTrip.
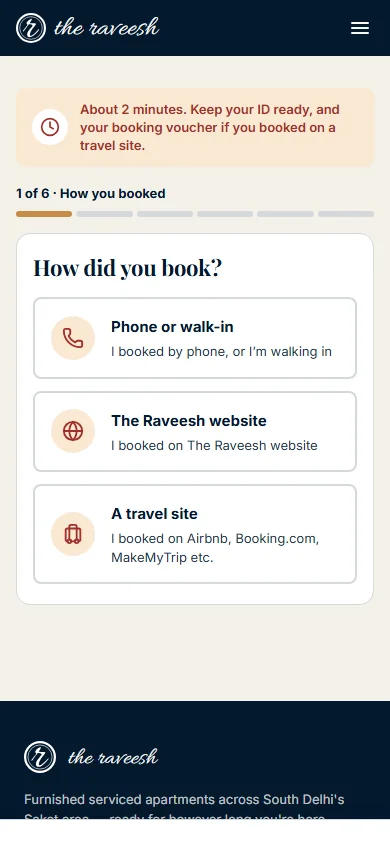
The top of the screen shows two parts, Stay and KYC. The part you are in is highlighted and a finished part has a tick. Each screen keeps its own heading, so you always see what it asks. The card does not show again after the first screen. The portal skips this question and uses your own mobile number.
Find your booking
- Type your mobile number or your reservation ID in the one box.
- Tap Next.
- Choose your booking from the list.
The list is called Which booking? and shows when more than one booking matches. After you choose, the next screen is You already have a booking. A number with ten digits is read as a mobile number. Anything else is read as a reservation ID or the travel site's booking reference. There is no SMS code to type.
If you already have a booking
Your number or reservation ID may match a booking that is waiting for approval, or approved and not yet started. Then the screen says You already have a booking. It shows the reference, the dates, the apartment type, the guests and Awaiting approval or Approved. Choose one of three rows, then tap Next. The first row is chosen for you.
- Change this booking opens Your stay with everything filled in. You can change the dates, the apartment type or the guests. We never make a second booking for a change.
- Add an apartment lets you choose an apartment type and how many more you need. We ask for them for the same dates. Our team confirms each one.
- Start a new booking instead replaces a request that is still waiting for approval. If the booking is already approved, the screen says so and asks you to change it or add an apartment, or to call 9873111110.
If you change the dates, the apartment type or the guests of an approved booking, our team checks it again. Your name, email and ID can change without that.
Check your stay
You can choose yesterday as your check-in date. Use it if you arrived after midnight and the night counts from yesterday. Nothing earlier than yesterday can be chosen.
- Check the Check-in date.
- Check the Check-out date.
- Choose the apartment type.
- Set the number of Adults.
- Set the number of Children.
- Tap Next.
You can change the dates and apartment type of a booking we found. If no apartment of that type is free, the screen says Not available for these dates. Please change your dates or apartment type. If you chose the travel site button and we found nothing, this screen asks for two more things. Next waits until you give both.
- Booking source: the travel site you booked on.
- Booking voucher: a photo or PDF. You can use jpg, png, pdf or HEIC.
Check your details
- Check your name, email and nationality.
- Tap Change next to your mobile number if it is wrong.
- Tap Next.
The portal skips this step when your profile is complete.
Add your ID
- Add your ID. Everyone must do this step.
- Add your selfie with Take selfie. It is required, and it is marked with a star.
- Tap Next when the ID and the selfie are added.
If the camera is blocked or your device has none, Take selfie also lets you choose a photo from your device. If you tap Next with no selfie, the screen says Add a selfie of your name to continue. and nothing is sent. Guests from outside India give the passport and the visa details. You give your ID type, ID number and photos each time, unless we show We have your ID on file. We never fill your ID into the screen from an earlier stay. Your name and email can fill in when your mobile number is on one guest record only. They carry the line From your earlier stay. A field we brought back from your own saved draft says From your saved draft. You can change or clear any of it. A photo opens full size when you tap it. The box for its number sits beside it, so you can type while you look. An ID photo opens with the ID or passport number. The visa photo opens with the visa number, type and expiry.
If we already have your ID
You may have stayed with us before. If you found your booking with your mobile number, and that number belongs to one guest we know, we may already hold your ID. Then the ID screen shows We have your ID on file. It names the ID type and the document. It never shows the number or the photo.
- Type the last 4 letters or digits of your ID number (not your mobile number) in Last 4 letters or digits of your ID number. Spaces, dashes and capital letters do not matter.
- Tap Next. If the 4 characters match, we use the ID we have. You still add your selfie. You do not add the ID photos again.
- If they do not match, the screen says That does not match. Please check it and try again. After 5 wrong tries in 30 minutes, we stop asking. The normal ID screen shows instead.
- Tap Use a different ID to add another ID. It becomes the ID we keep for you. The old one stays in your history.
- We only offer this when the ID on file has a number and a photo. If it does not, you add your ID as usual.
Guests from outside India do not see this screen. They give their passport as before. We ask for the visa details again at every stay.
Review and confirm
- Check the summary.
- Tap Edit next to anything that is wrong.
- Tap Confirm.
What happens next
- The screen says Your web check-in is complete. It shows a large reference number. Keep it.
- Confirm sends a request to our team. It does not give you an apartment yet. Our team approves it and chooses your apartment.
- Your booking source is Direct Phone, Website, or the travel site you picked.
- On the website, the screen says That’s everything. Nothing more to do. Two cards follow: Order room service, and Create account for a guest account.
- Already at the property? Show the screen at the front desk to collect your keys.
- For help, call 9873111110.
Who does what
- You: find your booking, check your stay, add your ID and confirm.
- Our team (Admin or Building Manager): approves the request, chooses your apartment and finishes your check-in on arrival day.
Watch out
- Your answers are saved after each screen on the same phone and browser. They stay until the day after your check-in date. Confirm clears them.
- When you come back, a small card asks Continue where you left off? Tap Continue to carry on, or Start over to delete what we saved, photos included, and begin again. If you already have a booking, that screen comes first.
- A saved ID stays as it is when you leave its box blank. Your selfie is always needed: a saved draft keeps the one you added.
- Keep your ID number to yourself. We ask only for its last 4 letters or digits, and only to show the ID is yours.
- You do not sign a form, tick the House Rules or pay inside Web check-in.
- To change something after you confirm, send us a message or tell the front desk.